Tutorial (30 min)
Please note: You need to be an Enterprise Stack customer & have access to the private enterprise stack images, to go through this tutorial.
In this tutorial, we will provide a comprehensive guide on setting up the enterprise API on your local machine. We will demonstrate the complete process of issuing and verifying a W3C credential that includes a revocation status property. Additionally, you can watch the accompanying video guide below.
1. Setup
For the setup, we will be using the walt.id enterprise quickstart repository. It can be used to explore enterprise features via a CLI tool and/or to bring up the whole stack using Docker Compose. We will be using the latter for this tutorial.
Clone the repo
git clone https://github.com/walt-id/waltid-enterprise-quickstart.git
Change Working Directory
cd waltid-enterprise-quickstart
Add Docker Token
Save the docker-access token provided by walt.id to get access to the private enterprise stack img.
echo "DOCKER_TOKEN_PROVIDED_BY_WALT_ID_HERE" > .docker-token
Run the stack via docker-compose
./waltid-enterprise run
When running the docker-compose a mongoDB database is created (used to store data for the Enterprise Stack) and the Enterprise API is started.
Visit the API
Visit enterprise.localhost:3000/swagger to view the API.
Learn more about the base domain (enterprise.localhost) configuration here and in general about the configurations files available for the Enterprise Stack here.
2. Super Admin - Auth
The first step, after the Enterprise Stack API is up and running is to register a super-admin user. One or multiple
super admin accounts can be specified via
the superadmin-registration.conf file.
This file can be found in the config folder of the quickstart-repo in your local
setup. (waltid-enterprise-quickstart/config)
Activate Super Admin
Endpoint:/v1/superadmin/create-by-token | API Reference
Example Request
curl -X 'POST' \
  'http://waltid.enterprise.localhost:3000/v1/superadmin/create-by-token' \
  -H 'accept: */*' \
  -H 'Content-Type: application/json' \
  -d '{
    <super-admin-token-specified-in-super-admin-conf-file>
  }'
Body
{
  <super-admin-token>
}
Body Content
Please provide the super-admin-token in the body without any quotation marks.
Response Codes
200- Super admin account activated successfully
Now that we have activated the super-admin user, we can login with the super-admin credentials also specified in
the superadmin-registration.conf using the
regular account/user login endpoint.
Login as Super Admin
Endpoint:/auth/account/emailpass | API Reference
Example Request
curl -X 'POST' \
  'http://waltid.enterprise.localhost:3000/auth/account/emailpass' \
  -H 'accept: */*' \
  -H 'Content-Type: application/json' \
  -d '{
    "email": "superadmin@walt.id",
    "password": "super123456"
  }'
Body
{
  "email": "superadmin@walt.id",
  "password": "super123456"
}
Body Parameters
email: String - Email of the super admin account. Defined insuperadmin-registration.conf.password: String - Password of the super admin account. Defined insuperadmin-registration.conf
Response
{
  "session_id": "39ed1ecd-aa61-4401-bf35-ca0a14a39c8e",
  "status": "OK",
  "token": "eyJhbGciOiJFZERTQSJ9.eyJzdWIiOiJmZmZmZmZmZi1mZmZmLWZmZmYtZmZmZi1mZmZmZmZmZmZmZmYiLCJzZXNzaW9uIjoiMzllZDFlY2QtYWE2MS00NDAxLWJmMzUtY2EwYTE0YTM5YzhlIn0.NEKj737AqG7T7SAfQ2RovhWSjBsXCWCLPmkLtr_O5i8q_42BFX7pSGZbIslRy1PEQ3HKrnXib6D06D1kZugvCw"
}
The token we receive can be used in subsequent requests as a Bearer token.
Authenticate as Super Admin via API
To access all protected endpoints of the Enterprise API, we will use the token obtained from the response of the previous request. This token should be included in the header of each subsequent request.
Example Request
curl -X 'POST' \
  'http://waltid.enterprise.localhost:3000/v1/...' \
  -H 'Authorization: Bearer {tokenReceived}'
  -d '{
    ...
  }'
To learn more about the Super Admin Account in general, click here.
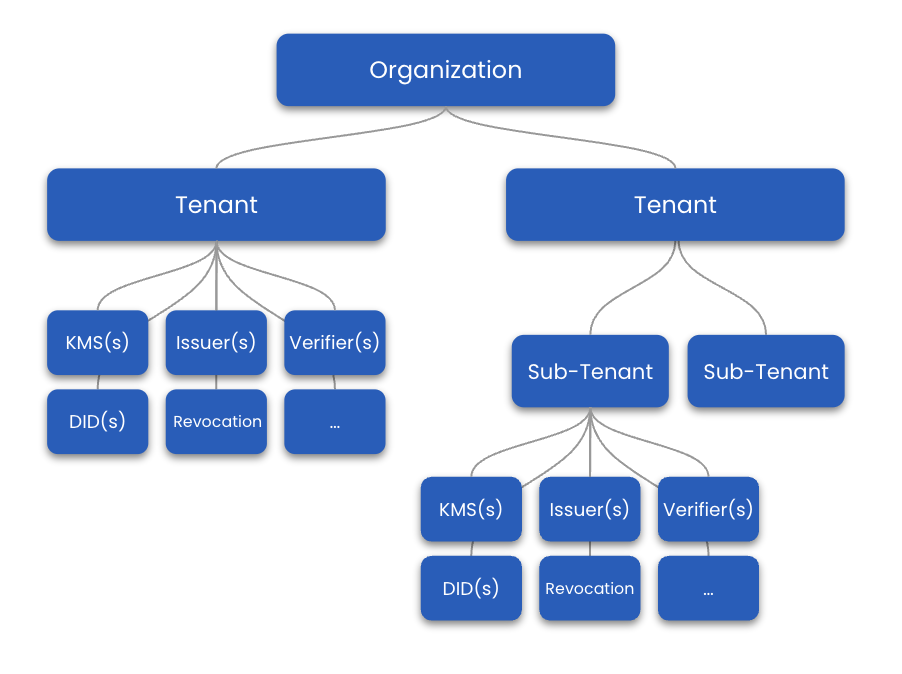
3. Organization
With the super-admin account active and the auth session token in our Authorization header, we can create an Organization.
The organization is at the top of the enterprise stack resource hierarchy, as shown in the diagram below. Under the Organization you can group customers as tenants, sub-tenants, or create a tenant of your own. This way services and their data can be kept virtually separate, enabling you to easily manage different customers or services of your own under one roof. Also, this structure allows you to build and sell B2B2C products (e.g., you can resell to business clients who offer consumer products).
While the Enterprise Stack allows for multiple Organizations, on-prem Enterprise deployments should always have only one Organization.
Create a new Organization
**Endpoint:
** /v1/admin/organizations | API Reference
Example Request
curl -X 'POST' \
  'http://enterprise.localhost:3000/v1/admin/organizations' \
  -H 'accept: */*' \
  -H 'Authorization: Bearer {yourToken}' \
  -H 'Content-Type: application/json' \
  -d '{
  "_id": "waltid",
  "profile": {
    "name": "Test GmbH"
  },
  "billing": {
    "billingCountry": "AT",
    "billingAddress": "test 111/115, 1090 Vienna",
    "vatNr": "test"
  }
}'
Body
{
  "_id": "string",
  "profile": {
    "name": "string"
  },
  "billing": {
    "billingCountry": "",
    "billingAddress": "",
    "vatNr": "",
    "iban": "",
    "swift": ""
  }
}
Body Parameters
_idtype: String - Unique identifier for the organization, e.g.waltid
profilename: String - Human readable name for the organization.
billing: Billing information
Response Codes
201- Organization created successfully.
When we create a new organization, an admin role is automatically generated in the background. This role is named using
the format [orgID].admin. For example, if our organization ID is waltid, the admin role will be
called waltid.admin.
In the next step, we will use this role to create an API Key that grants admin rights exclusively for a specific organization. This is a common pratice to not always use the super-admin to do regular day-to-day operations.
If you want to learn more about how permissions and roles work, please go here.
Also, each organization is given a unique subdomain, which is utilized for carrying out operations specific to that
organization. Operations that are not tied to any particular organization mainly involve the global admin endpoints,
as well as endpoints that do not require the target path parameter.
The structure of the subdomain for each new organization is as follows: {orgID}.{baseUrl}. For example, in our case, this would be represented as http://waltid.enterprise.localhost:3000.
Learn more about the Organization in general here.
4. API Keys - Auth
In this section, we will create an API for the organization and grant it admin rights by assigning the waltid.admin
role to the API key, which was automatically created along with the waltid organization in the last step.
Every operation from now on will be conducted within the scope of an organization, specifically waltid. Therefore, we
need to update the base URL of our API to include waltid. The new URL will
be http://waltid.enterprise.localhost:3000, in contrast to the previous URL, which
was http://enterprise.localhost:3000.
Create API-Key
Endpoint:/v1/{target}/apikeys-api/api-keys/create | API Reference
Example Request
curl -X 'POST' \
  'http://waltid.enterprise.localhost:3000/v1/waltid.myApiKey/apikeys-api/api-keys/create' \
  -H 'accept: */*' \
  -H 'Authorization: Bearer {yourToken}' \
  -H 'Content-Type: application/json' \
  -d '{
  "name": "My API Key",
  "expiration": "30d"
}'
Body
{
  "name": "My API Key",
  "expiration": "30d"
}
Path Parameters
orgID: - When performing operations within an organization, it is essential to use the organization's Base URL or another valid host alias. For example, if your organization is namedtest, your default Base URL will betest.enterprise-sandbox.walt.devwhen using the sandbox environment.target: resourceIdentifier - The target indicates the organization in which to create the new API Key and the API-Key's ID ({organizationID}.[YourID]), e.g.waltid.myApiKey
Body Parameters
name: String - Human readable name for API-Key.expiration: (optional) String - Expiration time of the API-Key.- Set expiration times using the kotlinx.datetime Duration Syntax. Valid units are
days (d), hours (h), minutes (m), and seconds (s), with finer granularity using milliseconds (ms), microseconds (
us),
and nanoseconds (ns). Examples include
5h,1d 12h, and1h 0m 30.340s.
- Set expiration times using the kotlinx.datetime Duration Syntax. Valid units are
days (d), hours (h), minutes (m), and seconds (s), with finer granularity using milliseconds (ms), microseconds (
us),
and nanoseconds (ns). Examples include
- Alternatively, you can use a simplified ISO-8601 duration format (PThHmMs.fS), such as P1DT2H3M4.058S. In this
  format:
    - The largest non-time designator is days (D). Years (Y), weeks (W), and months (M) are not parsed. Instead, use
      365d for years, 7d for weeks, and 30d for months.
    - A day is always assumed to be 24 hours (24-hour clock time scale).
    - There is currently no alternative week-based representation like ["P"][number]["W"].
Response
{
  "_id": "waltid.myApiKey",
  "name": "My API Key",
  "token": "eyJhbGciOiJFZERTQSJ9.eyJzdWIiOiJhYjNhZjc0Zi0wNmNhLTRkY2EtYWJlZi1iNjA3MTJjOTM5YzEiLCJzZXNzaW9uIjoiYXBpLWFiM2FmNzRmLTA2Y2EtNGRjYS1hYmVmLWI2MDcxMmM5MzljMSJ9.FHEmayjhrfZMnOnEecNnOa6ADDwBm1jL_tue64PhxCTk1DZJeIdz-KPvuwWdSlLgw538fqAIoW8ulv6-B91ZAw"
}
The returned token can be used as a Bearer token in API requests.
If you want to check the expiration time of the API-Key you can use the /v1/{target}/apikeys-api/api-keys/view
endpoint.
By default, the API key we just created doesn't have any permissions. Therefore, we will assign the API Key
the admin role waltid.admin in the next step.
Assigning Admin Role to API-Key
Endpoint:/v1/{target}/roles-api/roles/apikey/assign
Example Request
curl -X 'POST' \
  'http://waltid.enterprise.localhost:3000/v1/waltid.admin/roles-api/roles/apikey/assign' \
  -H 'accept: */*' \
  -H 'Authorization: Bearer {yourToken}' \
  -H 'Content-Type: application/json' \
  -d '
  {
  "apikey": "waltid.myApiKey"
  }'
Body
{
  "apikey": "waltid.myApiKey"
}
Path Parameters
orgID: - When performing operations within an organization, it is essential to use the organization's Base URL or another valid host alias. For example, if your organization is namedtest, your default Base URL will betest.enterprise-sandbox.walt.devwhen using the sandbox environment.target: resourceIdentifier - The target indicates the ID of the role to assign to an API-Key. e.g.waltid.admin
Body Parameters
apikey: resourceIdentifier - Specifies the ID of the API-Key to assign the role to.
Response Codes
200- Role assigned successfully.
3. Tenant
In this section, we will move further down the Enterprise Stack hirachy (shown below) and create our first tenant to then be able to launch different types of services like Issuer, Verifier and others.
You can also create sub-tenants inside of tenants and sub-tenants. At this point, there is no limit to the level of nested sub-tenants. Services and their data inside tenants and sub-tenants are kept separate.
Create a New Tenant
Endpoint:/v1/{target}/resource-api/tenants/create | API Reference
Example Request
curl -X 'POST' \
  'http://waltid.enterprise.localhost:3000/v1/waltid.tenant1/resource-api/tenants/create' \
  -H 'accept: */*' \
  -H 'Authorization: Bearer {yourToken}' \
  -H 'Content-Type: application/json' \
  -d '{
    "name": "My Tenant"
  }'
Body
{
  "name": "My Tenant"
}
Path Parameters
orgID: - When performing operations within an organization, it is essential to use the organization's Base URL or another valid host alias. For example, if your organization is namedtest, your default Base URL will betest.enterprise-sandbox.walt.devwhen using the sandbox environment.target: resourceIdentifier - The target indicates the organization in which to create the new tenant and the tenant's ID ({organizationID}.[YourID]), e.g.waltid.tenant1
Body Parameters
name: String - Human readable name for the tenant.
Response Codes
201- Tenant created successfully.
4. Services
With the new tenant created, we will now establish various types of services within this tenant, progressing further down the hierarchy illustrated in the diagram below.
Services To Be Created
- KMS Service - Create and manage keys based on different algorithms.
- DID Service - Create DID based on various methods (did:key, did: web, ...).
- DID Store Service - Store and query DIDs & DID Documents.
- Issuer Service - Sign & Issue various credentials (W3C, SD-JWT VC) via OID4VC.
- Credential Status Service - Create, update, and manage status credentials.
- Verifier Service - Request & verify various types of digital credentials via OID4VP.
- Wallet Service - Run identity wallets for individuals or organizations.
- Credential Store Service - Store and query different types of credentials (e.g. W3C, SD-JWT VC, mDL).
Create A KMS Service
First, we will set up a Key Management Service (KMS) to create and store the keys necessary for signing the verifiable credential and the status credential. In this tutorial, we will use the Enterprise Stack database to store these keys. However, for production scenarios, it is recommended to store the keys in an external KMS that the Enterprise Stack can access through integrations. For more information about the supported KMS providers, please go here.
Setup Key Service
Endpoint: /v1/{target}/resource-api/services/create | API Reference
Example Request
curl -X 'POST' \
  'http://waltid.enterprise.localhost:3000/v1/waltid.tenant1.kms1/resource-api/services/create' \
  -H 'accept: */*' \
  -H 'Authorization: Bearer {yourToken}' \
  -H 'Content-Type: application/json' \
  -d '{
  "type": "kms"
}'
Body
{
  "type": "kms"
}
Path Parameters
orgID: - When performing operations within an organization, it is essential to use the organization's Base URL or another valid host alias. For example, if your organization is namedtest, your default Base URL will betest.enterprise-sandbox.walt.devwhen using the sandbox environment.target: resourceIdentifier - The target indicates the organization + tenant in which to create the new KMS service and the service's ID ({organizationID}.{tenantID}.[NewKmsServiceID]), e.g.waltid.tenant1.kms1
Body Parameters
type: serviceType - Specifies the type of service to create. In our casekms
Response Codes
201- Service created successfully.
Create Key
Endpoint: /v1/{target}/kms-service-api/keys/generate | API Reference
Example Request
curl -X 'POST' \
  'http://waltid.enterprise.localhost:3000/v1/waltid.tenant1.kms1.key1/kms-service-api/keys/generate' \
  -H 'accept: */*' \
  -H 'Authorization: Bearer {yourToken}' \
  -H 'Content-Type: application/json' \
  -d '{
  "backend": "jwk",
  "keyType": "Ed25519"
}'
Body
{
  "backend": "jwk",
  "keyType": "Ed25519"
}
Path Parameters
orgID: - When performing operations within an organization, it is essential to use the organization's Base URL or another valid host alias. For example, if your organization is namedtest, your default Base URL will betest.enterprise-sandbox.walt.devwhen using the sandbox environment.target: resourceIdentifier - The target indicates the organization + tenant + kmsService in which to create the new key and the key's ID ({organizationID}.{tenantID}.{kmsServiceID}.[newKeyID]), e.g.waltid.tenant1.kms1.key1
Body Parameters
backend: String - Specifies the storage type of key.jwkmeans the local storage option is used and the key is stored in the Enterprise Stack backend.keyType: String - the algorithm used to generate the key. For local, it can be ed25519, secp256k1, secp256r1, or RSA.
Response
201 - Key created successfully.
{
  "_id": "waltid.tenant1.kms1.key1",
  "key": {
    "type": "jwk",
    "jwk": {
      "kty": "OKP",
      "d": "ywmoRVTD9fexMtGW0lKE3o9_0ulfzGXr9xHGL0lPhhA",
      "crv": "Ed25519",
      "kid": "IQO7DILxtagpTLXkuHkRkJURb2GqcUIwXYZAcGwW1AU",
      "x": "JOsiIE7ME9UZ8y2H-P5RSuYAUiIfs1ywtdBjMGN7I5s"
    }
  },
  "parent": "waltid.tenant1.kms1"
}
Now, we created one key that can be used for both the issuer and the credential status service in this tutorial. In practice, however, different keys should be created for different purposes. You can also use the example above to create another key if desired.
In the next step, we will create a DID service and create a did:key for our key.
Create DID Service
Endpoint: /v1/{target}/resource-api/services/create | API Reference
Example Request
curl -X 'POST' \
  'http://waltid.enterprise.localhost:3000/v1/waltid.tenant1.did-service-1/resource-api/services/create' \
  -H 'accept: */*' \
  -H 'Authorization: Bearer {yourToken}' \
  -H 'Content-Type: application/json' \
  -d '{
  "type": "did"
}'
Body
{
  "type": "did"
}
Path Parameters
orgID: - When performing operations within an organization, it is essential to use the organization's Base URL or another valid host alias. For example, if your organization is namedtest, your default Base URL will betest.enterprise-sandbox.walt.devwhen using the sandbox environment.target: resourceIdentifier - The target indicates the organization + tenant in which to create the new DID service and the service's ID ({organizationID}.{tenantID}.[NewDIDServiceID]), e.g.waltid.tenant1.did1
Body Parameters
type: serviceType - Specifies the type of service to create. In our casedid
Response Codes
201- Service created successfully.
Create DID Store (for Issuer DID)
We will create a DID Store for persisting the issuer's DID and DID Document and link it to the DID Service so that any newly created DID is stored automatically.
Endpoint: /v1/{target}/resource-api/services/create | API Reference
Example Request
curl -X 'POST' \
  'http://waltid.enterprise.localhost:3000/v1/waltid.tenant1.did-store-issuer-1/resource-api/services/create' \
  -H 'accept: */*' \
  -H 'Authorization: Bearer {yourToken}' \
  -H 'Content-Type: application/json' \
  -d '{
  "type": "did-store"
}'
Body
{
  "type": "did-store"
}
Path Parameters
orgID: - When performing operations within an organization, it is essential to use the organization's Base URL or another valid host alias. For example, if your organization is namedtest, your default Base URL will betest.enterprise-sandbox.walt.devwhen using the sandbox environment.target: resourceIdentifier - The target indicates the organization + tenant in which to create the new DID store and the service's ID ({organizationID}.{tenantID}.[NewDidStoreServiceID]), e.g.waltid.tenant1.did-store-issuer-1
Response Codes
201- Service created successfully.
Link DID Store to DID Service
Now link the DID Store to the DID Service so that newly created DIDs are stored automatically.
Endpoint: /v1/{target}/did-service-api/dids/dependencies/add | API Reference
Example Request
curl -X 'POST' \
  'http://waltid.enterprise.localhost:3000/v1/waltid.tenant1.did-service-1/did-service-api/dids/dependencies/add' \
  -H 'accept: */*' \
  -H 'Authorization: Bearer {yourToken}' \
  -H 'Content-Type: application/json' \
  -d 'waltid.tenant1.did-store-issuer-1'
Body
waltid.tenant1.did-store-issuer-1
Path Parameters
orgID: - When performing operations within an organization, it is essential to use the organization's Base URL or another valid host alias. For example, if your organization is namedtest, your default Base URL will betest.enterprise-sandbox.walt.devwhen using the sandbox environment.target: resourceIdentifier - The target indicates the organization + tenant + DID service to which to add an existing DID Store ({organizationID}.{tenantID}.{didServiceID}), e.g.waltid.tenant1.did-service-1
Response Codes
201- Unit attached.
Create did:key
Endpoint: /v1/{target}/did-service-api/dids/create/key | API Reference
Example Request
curl -X 'POST' \
  'http://waltid.enterprise.localhost:3000/v1/waltid.tenant1.did-service-1/did-service-api/dids/create/key' \
  -H 'accept: */*' \
  -H 'Authorization: Bearer {yourToken}' \
  -H 'Content-Type: application/json' \
  -d '{
  "keyId": "waltid.tenant1.kms1.key1",
  "useJwkJcsPub": false
}'
Body
{
  "keyId": "waltid.tenant1.kms1.key1",
  "useJwkJcsPub": false
}
Path Parameters
orgID: - When performing operations within an organization, it is essential to use the organization's Base URL or another valid host alias. For example, if your organization is namedtest, your default Base URL will betest.enterprise-sandbox.walt.devwhen using the sandbox environment.target: resourceIdentifier - The target indicates the organization + tenant + DID service in which to execute the DID creation ({organizationID}.{tenantID}.{didServiceID}), e.g.waltid.tenant1.did1
Body Parameters
keyId: resourceIdentifier - Specifies the key for which to generate a DID + DID Document. Please make sure that the key is stored in a KMS service under the same tenant as the DID service.useJwkJcsPub: boolean - If set totrueit generates an EBSI compliant DID:key + DID Document. This is only important if you are operating within the EBSI ecosystem.
Because we linked a DID Store to the DID Service, the new DID and DID Document will be stored automatically in waltid.tenant1.did-store-issuer-1.
Response
201- DID created successfully.
{
  "did": "did:key:z2dmzD81cgPx8Vki7JbuuMmFYrWPgYoytykUZ3eyqht1j9KbptHxPSZ7khwjrFU8X6aCeeqW3jTNdoAMWZCHMFmVeZYDYbeCZgy5mYuY2a3X3GrAKGkSW31bxMSV5n2okQJd9UckKn7mEdqnDSv6xFfejCekE2oSEE1hUX62Ww2pUn39zt",
  "document": {
    "@context": [
      "https://www.w3.org/ns/did/v1",
      "https://w3id.org/security/suites/jws-2020/v1"
    ],
    "id": "did:key:z2dmzD81cgPx8Vki7JbuuMmFYrWPgYoytykUZ3eyqht1j9KbptHxPSZ7khwjrFU8X6aCeeqW3jTNdoAMWZCHMFmVeZYDYbeCZgy5mYuY2a3X3GrAKGkSW31bxMSV5n2okQJd9UckKn7mEdqnDSv6xFfejCekE2oSEE1hUX62Ww2pUn39zt",
    "verificationMethod": [
      {
        "id": "did:key:z2dmzD81cgPx8Vki7JbuuMmFYrWPgYoytykUZ3eyqht1j9KbptHxPSZ7khwjrFU8X6aCeeqW3jTNdoAMWZCHMFmVeZYDYbeCZgy5mYuY2a3X3GrAKGkSW31bxMSV5n2okQJd9UckKn7mEdqnDSv6xFfejCekE2oSEE1hUX62Ww2pUn39zt#z2dmzD81cgPx8Vki7JbuuMmFYrWPgYoytykUZ3eyqht1j9KbptHxPSZ7khwjrFU8X6aCeeqW3jTNdoAMWZCHMFmVeZYDYbeCZgy5mYuY2a3X3GrAKGkSW31bxMSV5n2okQJd9UckKn7mEdqnDSv6xFfejCekE2oSEE1hUX62Ww2pUn39zt",
        "type": "JsonWebKey2020",
        "controller": "did:key:z2dmzD81cgPx8Vki7JbuuMmFYrWPgYoytykUZ3eyqht1j9KbptHxPSZ7khwjrFU8X6aCeeqW3jTNdoAMWZCHMFmVeZYDYbeCZgy5mYuY2a3X3GrAKGkSW31bxMSV5n2okQJd9UckKn7mEdqnDSv6xFfejCekE2oSEE1hUX62Ww2pUn39zt",
        "publicKeyJwk": {
          "kty": "EC",
          "crv": "P-256",
          "kid": "zY9AzWFTMKveeXIdHWSsvX16Cso1JXMEVKGFUuw_LkQ",
          "x": "PMzrrJU6Gh5JZK_6aIpiWWHcGoWymGFkYptM10a1sec",
          "y": "6-hp5Y7Hpb9nFfovyeycXSPubEJ7LWdaGNoCcKZCIyA"
        }
      }
    ],
    "assertionMethod": [
      "did:key:z2dmzD81cgPx8Vki7JbuuMmFYrWPgYoytykUZ3eyqht1j9KbptHxPSZ7khwjrFU8X6aCeeqW3jTNdoAMWZCHMFmVeZYDYbeCZgy5mYuY2a3X3GrAKGkSW31bxMSV5n2okQJd9UckKn7mEdqnDSv6xFfejCekE2oSEE1hUX62Ww2pUn39zt#z2dmzD81cgPx8Vki7JbuuMmFYrWPgYoytykUZ3eyqht1j9KbptHxPSZ7khwjrFU8X6aCeeqW3jTNdoAMWZCHMFmVeZYDYbeCZgy5mYuY2a3X3GrAKGkSW31bxMSV5n2okQJd9UckKn7mEdqnDSv6xFfejCekE2oSEE1hUX62Ww2pUn39zt"
    ],
    "authentication": [
      "did:key:z2dmzD81cgPx8Vki7JbuuMmFYrWPgYoytykUZ3eyqht1j9KbptHxPSZ7khwjrFU8X6aCeeqW3jTNdoAMWZCHMFmVeZYDYbeCZgy5mYuY2a3X3GrAKGkSW31bxMSV5n2okQJd9UckKn7mEdqnDSv6xFfejCekE2oSEE1hUX62Ww2pUn39zt#z2dmzD81cgPx8Vki7JbuuMmFYrWPgYoytykUZ3eyqht1j9KbptHxPSZ7khwjrFU8X6aCeeqW3jTNdoAMWZCHMFmVeZYDYbeCZgy5mYuY2a3X3GrAKGkSW31bxMSV5n2okQJd9UckKn7mEdqnDSv6xFfejCekE2oSEE1hUX62Ww2pUn39zt"
    ],
    "capabilityInvocation": [
      "did:key:z2dmzD81cgPx8Vki7JbuuMmFYrWPgYoytykUZ3eyqht1j9KbptHxPSZ7khwjrFU8X6aCeeqW3jTNdoAMWZCHMFmVeZYDYbeCZgy5mYuY2a3X3GrAKGkSW31bxMSV5n2okQJd9UckKn7mEdqnDSv6xFfejCekE2oSEE1hUX62Ww2pUn39zt#z2dmzD81cgPx8Vki7JbuuMmFYrWPgYoytykUZ3eyqht1j9KbptHxPSZ7khwjrFU8X6aCeeqW3jTNdoAMWZCHMFmVeZYDYbeCZgy5mYuY2a3X3GrAKGkSW31bxMSV5n2okQJd9UckKn7mEdqnDSv6xFfejCekE2oSEE1hUX62Ww2pUn39zt"
    ],
    "capabilityDelegation": [
      "did:key:z2dmzD81cgPx8Vki7JbuuMmFYrWPgYoytykUZ3eyqht1j9KbptHxPSZ7khwjrFU8X6aCeeqW3jTNdoAMWZCHMFmVeZYDYbeCZgy5mYuY2a3X3GrAKGkSW31bxMSV5n2okQJd9UckKn7mEdqnDSv6xFfejCekE2oSEE1hUX62Ww2pUn39zt#z2dmzD81cgPx8Vki7JbuuMmFYrWPgYoytykUZ3eyqht1j9KbptHxPSZ7khwjrFU8X6aCeeqW3jTNdoAMWZCHMFmVeZYDYbeCZgy5mYuY2a3X3GrAKGkSW31bxMSV5n2okQJd9UckKn7mEdqnDSv6xFfejCekE2oSEE1hUX62Ww2pUn39zt"
    ],
    "keyAgreement": [
      "did:key:z2dmzD81cgPx8Vki7JbuuMmFYrWPgYoytykUZ3eyqht1j9KbptHxPSZ7khwjrFU8X6aCeeqW3jTNdoAMWZCHMFmVeZYDYbeCZgy5mYuY2a3X3GrAKGkSW31bxMSV5n2okQJd9UckKn7mEdqnDSv6xFfejCekE2oSEE1hUX62Ww2pUn39zt#z2dmzD81cgPx8Vki7JbuuMmFYrWPgYoytykUZ3eyqht1j9KbptHxPSZ7khwjrFU8X6aCeeqW3jTNdoAMWZCHMFmVeZYDYbeCZgy5mYuY2a3X3GrAKGkSW31bxMSV5n2okQJd9UckKn7mEdqnDSv6xFfejCekE2oSEE1hUX62Ww2pUn39zt"
    ]
  }
}
Please make sure to save the generated DID (Decentralized Identifier) along with the key ID for future reference. This information will be necessary, when issuing credentials through the Issuer Service. We are working on a solution to have this more easily referenced from the issuer service.
Create Wallet Service
We’ll create a Wallet Service for the holder, along with its own KMS and DID Service, plus a DID Store and Credential Store. The DID Service will generate a did:key for this wallet. We’ll use a helper endpoint to set up the wallet and all its dependencies in one step, so there’s no need to manually link the KMS, DID Service, or the DID and Credential Stores to the wallet service. The dependency services will play the following roles:
- KMS Service - Will store and manage the wallet's keys.
- DID Service - Will help with the creation of DIDs based on keys managed via the KMS service.
- DID Store - Will store the DIDs & DID Documents created by the DID service.
- Credential Store - Will store the credentials received via the wallet service.
To dive deeper into the Wallet Service and its API, see the Wallet Service docs.
Endpoint: /v1/{target}/wallet-service-api/init-wallet | API Reference
Example Request
curl -X 'POST' \
  'http://waltid.enterprise.localhost:3000/v1/waltid.tenant1.wallet1/wallet-service-api/init-wallet' \
  -H 'accept: */*' \
  -H 'Authorization: Bearer {yourToken}' \
  -H 'Content-Type: application/json' \
  -d '{
  "createKms": true,
  "kmsName": "wallet-kms-1",
  "createKeyInKms": { "backend": "jwk", "keyType": "Ed25519" },
  "createDidService": true,
  "didServiceName": "wallet-did-service-1",
  "createDidWithDidService": "key",
  "createDidStore": true,
  "didStoreName": "wallet-did-store-1",
  "createCredentialStore": true,
  "credentialStoreName": "wallet-credential-store-1"
}'
Body
{
  "createKms": true,
  "kmsName": "wallet-kms-1",
  "createKeyInKms": { "backend": "jwk", "keyType": "Ed25519" },
  "createDidService": true,
  "didServiceName": "wallet-did-service-1",
  "createDidWithDidService": "key",
  "createDidStore": true,
  "didStoreName": "wallet-did-store-1",
  "createCredentialStore": true,
  "credentialStoreName": "wallet-credential-store-1"
}
Notes
- This creates a new dedicated KMS (
waltid.tenant1.wallet-kms-1) and DID Service (waltid.tenant1.wallet-did-service-1) for the wallet and generates a key for it. - Set
createDidWithDidServiceto "key" to provision a did:key for the wallet. - This also creates and links a DID Store (
waltid.tenant1.wallet-did-store-1) and a Credential Store (waltid.tenant1.wallet-credential-store-1). The generated DID is stored in the created DID Store.
(Optional) Find the Wallet DID reference in the DID Store
Use the DID Store to list stored DID IDs and compose the DID reference as waltid.tenant1.did-store-1.{didId}.
Endpoint: /v1/{target}/did-store-service-api/dids/list-did-ids
curl -X 'GET' \
  'http://waltid.enterprise.localhost:3000/v1/waltid.tenant1.wallet-did-store-1/did-store-service-api/dids/list-did-ids' \
  -H 'accept: */*' \
  -H 'Authorization: Bearer {yourToken}'
This returns an array like ["wallet_did"]. Combine it as waltid.tenant1.wallet-did-store-1.wallet_did when a DID reference is needed below.
Create Credential Status Service (optional)
In this section, we will set up a credential status service and create a configuration for it. To proceed with this section, you need to have an account with one of the following cloud providers: AWS, Azure, or Google Cloud. This is necessary because the credential status must be hosted publicly, and currently, we only support these three providers for hosting.
If you prefer not to create a cloud account (AWS, Azure, or Google Cloud) which is required for this step or wish to skip the credential status setup altogether, you can move directly to the example for creating an issuer.
Credential Status Service Setup
The Credential Status service enables users to create, update, and manage status credentials. Status credentials can have different purposes depending on the use-case. The most common purpose is revocation.
Currently, status credentials can be stored and made available via three types of external services:
Endpoint: /v1/{target}/resource-api/services/create | API Reference
Example Request
curl -X 'POST' \
  'http://waltid.enterprise.localhost:3000/v1/waltid.tenant1.credential-status-service-1/resource-api/services/create' \
  -H 'accept: */*' \
  -H 'Authorization: Bearer {yourToken}' \
  -H 'Content-Type: application/json' \
  -d '{
  "type": "credential-status",
  "config": {
    "registry": {
      "type": "aws",
      "bucketName": "bucket-name",
      "region": "region",
      "accessKeyId": "s3-access-key-id",
      "secretKey": "s3-secret-key"
    },
    "bucketUrl": "https://bucket-name.s3.amazonaws.com"
  }
}'
Body
{
  "type": "credential-status",
  "config": {
    "registry": {
      "type": "aws",
      "bucketName": "bucket-name",
      "region": "region",
      "accessKeyId": "s3-access-key-id",
      "secretKey": "s3-secret-key"
    },
    "bucketUrl": "https://bucket-name.s3.amazonaws.com"
  }
}
Path Parameters
orgID: - When performing operations within an organization, it is essential to use the organization's Base URL or another valid host alias. For example, if your organization is namedtest, your default Base URL will betest.enterprise-sandbox.walt.devwhen using the sandbox environment.target: resourceIdentifier - The target indicates the organization + tenant in which to create the new credential status service and the service's ID ({organizationID}.{tenantID}.[NewCredentialStatusServiceID]), e.g.waltid.tenant1.credential-status-service-id
Body Parameters
type: credential-status - Specifies the type of service to create. In this case, it iscredential-status.config: object - Storage configurations for status credential service.registry: object - Defines registry & access credentials for chosen registry.type: aws - Indicates the type of registry, which isawsin this context.bucketName: string - The name of the AWS S3 bucket.region: string - The AWS region where the bucket is located.accessKeyId: string - The access key ID for accessing the AWS S3 bucket.secretKey: string - The secret access key for accessing the AWS S3 bucket.
bucketUrl: string - The URL of the chosen registry bucket, e.g. "https://bucket-name.s3.amazonaws.com" for AWS.
Response Codes
201- Service created successfully.401- Invalid authentication.
Create A Status List Credential Configuration
Before we can create a status for a specific credential, we first need to establish a status credential configuration. This configuration serves as the blueprint for creating a status credential. The status credential itself is responsible for holding the status entries of one or more credentials. Each time we issue a new status for a credential that we want to provide to a holder, the status credential get updated, re-issued, and made publicly available through the configured registry.
When defining the configuration, we specify which key will sign the status credential, the Decentralized Identifier (
DID) of the issuer, and the configuration details of the status itself. This configuration includes the purpose of the
status (for example, revocation), the statusSize, and additional parameters.
In the example below, we will create a configuration specifically for a revocation status credential.
One StatusListCredential can host 32.000 status list entries.
Endpoint: /v1/{target}/credential-status-service-api/status-credential/create | API Reference
Example Request
curl -X 'POST' \
  'http://waltid.enterprise.localhost:3000/v1/waltid.tenant1.credential-status-service-1.config1/credential-status-service-api/status-credential/create' \
  -H 'accept: */*' \
  -H 'Authorization: Bearer {yourToken}' \
  -H 'Content-Type: application/json' \
  -d '{
  "kid": "waltid.tenant1.kms1.key1",
  "did": "did:jwk:eyJrdHkiOiJPS1AiLCJjcnYiOiJFZDI1NTE5Iiwia2lkIjoiMW1rQnBEYWZqVk9ONm9XVmlIZGREZXNEYXpKaXk1R0NTYko3VDU4QkJ3cyIsIngiOiJzZ1BiZWRPQjl1WEMtVG54LUVhV1IxRmg1Y25JLUxRLU43NUV1UE8wV2VFIn0",
  "config": {
    "purpose": "revocation",
    "type": "StatusList2021",
    "statusSize": 1,
    "statuses": [
      {
        "status": "0x0",
        "message": "unset"
      },
      {
        "status": "0x1",
        "message": "set"
      }
    ]
  }
}'
Path Parameters
orgID: - When performing operations within an organization, it is essential to use the organization's Base URL or another valid host alias. For example, if your organization is namedtest, your default Base URL will betest.enterprise-sandbox.walt.devwhen using the sandbox environment.target: resourceIdentifier - The target indicates the organization + tenant + credential status service in which to execute the status credential creation ({organizationID}.{tenantID}.{credentialStatusServiceID}), e.g.waltid.tenant1.status-service1
Body
{
  "kid": "waltid.tenant1.kms1.key1",
  "did": "did:jwk:eyJrdHkiOiJPS1AiLCJjcnYiOiJFZDI1NTE5Iiwia2lkIjoiMW1rQnBEYWZqVk9ONm9XVmlIZGREZXNEYXpKaXk1R0NTYko3VDU4QkJ3cyIsIngiOiJzZ1BiZWRPQjl1WEMtVG54LUVhV1IxRmg1Y25JLUxRLU43NUV1UE8wV2VFIn0",
  "config": {
    "purpose": "revocation",
    "type": "StatusList2021",
    "statusSize": 1,
    "statuses": [
      {
        "status": "0x0",
        "message": "unset"
      },
      {
        "status": "0x1",
        "message": "set"
      }
    ]
  }
}
Body Parameters
kid: resourceIdentifier - Specifies a key used for singing the status credential. The key must come from a KMS service that lives under the same tenant as the credential status service.did: String - Specifies that DID related to thekid.config: Object - Status credential configuration.purpose: String - Describes the type of status e.g.revocation,suspensionor any other custom type.type: String - Describes the status credential standard. It should beStatusList2021.statusSize: String - Describes the size of each status entry in bits. The default value is 1, meaning each status is represented by a single bit. If a value greater than 1 is used, it allows for more complex status messages, and the number of possible status messages must equal the number of possible values (e.g., 2^statusSize).statuses: Array - An array of objects, each representing a possible status value and its associated message. Each object contains:status: A string representing the hexadecimal value of the status, prefixed with 0x.message: A descriptive string used by developers for debugging purposes, indicating what the status value represents. It is not intended for end-user display.
Response
201- Credential Status config created successfully.
Create Issuer Service
In this section, we will create an issuer service to issue credentials via OID4VCI. We will configure the issuer
service to support the issuance of W3C UniversityDegree type credentials using JWT signatures. You can learn more
about how to configure other and custom
credentials here.
Endpoint: /v1/{target}/resource-api/services/create | API Reference
Example Request
curl -X 'POST' \
  'http://waltid.enterprise.localhost:3000/v1/waltid.tenant1.issuer1/resource-api/services/create' \
  -H 'accept: */*' \
  -H 'Authorization: Bearer {yourToken}' \
  -H 'Content-Type: application/json' \
  -d '{
  "type": "issuer",
  "baseUrl": "http://waltid.enterprise.localhost:3000",
  "kms": "waltid.tenant1.kms1",
  "tokenKeyId": "waltid.tenant1.kms1.key1",
  "supportedCredentialTypes": {
    "UniversityDegree_jwt_vc_json": {
      "format": "jwt_vc_json",
      "cryptographic_binding_methods_supported": [
        "did"
      ],
      "credential_signing_alg_values_supported": [
        "ES256"
      ],
      "credential_definition": {
        "type": [
          "VerifiableCredential",
          "UniversityDegree"
        ]
      }
    }
  }
}'
Body
{
  "type": "issuer",
  "baseUrl": "http://waltid.enterprise.localhost:3000",
  "kms": "waltid.tenant1.kms1",
  "tokenKeyId": "waltid.tenant1.kms1.key1",
  "supportedCredentialTypes": {
    "UniversityDegree_jwt_vc_json": {
      "format": "jwt_vc_json",
      "cryptographic_binding_methods_supported": [
        "did"
      ],
      "credential_signing_alg_values_supported": [
        "ES256"
      ],
      "credential_definition": {
        "type": [
          "VerifiableCredential",
          "UniversityDegree"
        ]
      }
    }
  }
}
Path Parameters
orgID: - When performing operations within an organization, it is essential to use the organization's Base URL or another valid host alias. For example, if your organization is namedtest, your default Base URL will betest.enterprise-sandbox.walt.devwhen using the sandbox environment.target: resourceIdentifier - The target indicates the organization + tenant in which to create the new Issuer service and the service's ID ({organizationID}.{tenantID}.[NewIssuerServiceID]), e.g.waltid.tenant1.issuer1
Body Parameters
type: serviceType - Specifies the type of service to create. In our caseissuerbaseUrl: String - This URL will be included in the generated OIDC4VC offer, allowing the wallet to know how to reach the issuer. It should reflect your organization's base URL. The general format for this URL ishttps://{orgID}.yourEnterpriseStackUrl.com. For example, if your organization is named myorg and the Enterprise Stack is hosted at the domain enterprise-stack.com, your base URL would be: https://myorg.enterprise-stack.com.kms: - resourceIdentifier - A KMS service you want to connect with the to be created Issuer service. It should be setup under the same tenant.tokenKeyId: - resourceIdentifier - A key in the connected KMS service used to sign the access token, which is used to get the credential from the credential endpointsupportedCredentialTypes: Object - A map of credentials the issuer supports. This list will be used to generate the issuer metadata. This list of supported credentials can be updated also after the initial setup.Expand For W3C JWT & SD-JWT Credentials
To specify the support of a W3C credential the object will look as follows:
"OpenBadgeCredential_jwt_vc_json": {
    "format": "jwt_vc_json",
    "cryptographic_binding_methods_supported": [
      "did"
    ],
    "credential_signing_alg_values_supported": [
      "ES256"
    ],
    "credential_definition": {
      "type": [
        "VerifiableCredential",
        "OpenBadgeCredential"
      ]
    }
  }
The key will have the following structure: [CustomCredentialType]_jwt_vc_json,
e.g. OpenBadgeCredential_jwt_vc_json
Inside the object:
- `format` - will be `jwt_vc_json` for W3C JWT & SD-JWT credentials
- `cryptographic_binding_methods_supported` - will be `did`
- `credential_signing_alg_values_supported` - will be `ES256`
- `credential_definition`
    - `type` - specifies a list of credential types. E.g. `[VerifiableCredential, MyCustomCredential]`
        1. First Entry: Your list must always start with `VerifiableCredential`.
        2. Subsequent Entries: After `VerifiableCredential`, you have two options:

        - You can add your custom type, such as `CustomCredential`.
        - If your credential is based on another credential (for example, `VerifiableAttestation`), first list all
          the
          credentials it builds upon, and then add your custom type at the end.

</details>

<br/>
<br/>
<details><summary>Expand For SD-JWT VC Credentials</summary>
<br/>
To specify the support of a SD-JWT VC credential the object will look as follows:
"identity_credential_vc+sd-jwt": {
    "format": "vc+sd-jwt",
    "vct": "{vctBaseURL}/identity_credential",
    "cryptographic_binding_methods_supported": [
      "jwk"
    ],
    "credential_signing_alg_values_supported": [
      "ES256"
    ],
    "sdJwtVcTypeMetadata": {
      "name": "Identity Credential",
      "description": "The Identity Verifiable Credential",
      "vct": "{vctBaseURL}/identity_credential"
    }
  }
The key will have the following structure: [custom_credential_type]_vc+sd-jwt,
e.g. identity_credential_vc+sd-jwt
Inside the object:
- `format` - will be `vc+sd-jwt` for SD-JWT VC credentials.
- `vct` - will follow the structure `{vctBaseURL}/[custom_credential_type]`,
  e.g. `{vctBaseURL}/custom_credential_type`.
  The vctBaseURL will be replaced during issuance by the issuer API.
- `cryptographic_binding_methods_supported` - will be `jwk`
- `credential_signing_alg_values_supported` - will be `ES256`
- `sdJwtVcTypeMetadata`
    - `name` - Name of the credential
    - `description` - Description of the credential
    - `vct` - Holding the same value as the `vct` above.

  </details>
displayConfigurations(optional) - an optional list of objects, where each object contains specific display information for different languages. Including the local option is not mandatory; you can simply provide one object if localization is not required. To learn more about the display config in general go here, for object property details expand below.
Expand to learn more about the display config object properties
Display Config Object
{
  "name": "walt.id Enterprise Issuer Service",
  "locale": "en-US",
  "logo": {
    "uri": "http://cdn.walt.id/issuer/logo.png",
    "alt_text": "Logo of walt.id Enterprise Issuer Service"
  }
}
```

- `name` (optional) _String_: String value of a display name for the Credential Issuer.
    - `locale` (optional) _String_: String value that identifies the language of this object represented as a
      language tag
      taken from values defined in
      BCP47 [RFC5646](https://openid.net/specs/openid-4-verifiable-credential-issuance-1_0.html#RFC5646). There MUST
      be only
      one object for each language identifier. Example values are: `en-US`, `de-DE`, or `fr-FR`.
    - `logo` (optional) _Object_: Object with information about the logo of the Credential Issuer.
        - `uri` _String_: String value that contains a URI where the Wallet can obtain the logo of the Credential
          Issuer.
        - `alt_text` (optional) _String_: String value of the alternative text for the logo image.
</details>

---

**Response Codes**
201- Service created successfully.
Create Verifier Service
In this section, we will create a verifier service to verify credentials via OID4VCP.
Endpoint: /v1/{target}/resource-api/services/create | API Reference
Example Request
curl -X 'POST' \
  'http://waltid.enterprise.localhost:3000/v1/waltid.tenant1.verifier1/resource-api/services/create' \
  -H 'accept: */*' \
  -H 'Authorization: Bearer {yourToken}' \
  -H 'Content-Type: application/json' \
  -d '{
  "type": "verifier",
  "baseUrl": "http://waltid.enterprise.localhost:3000"
}'
Body
{
  "type": "verifier",
  "baseUrl": "http://waltid.enterprise.localhost:3000",
  "metadataConfig": {
    "name": "walt.id Enterprise Verifier",
    "logoUri": "https://cdn.walt.id/verifier/logo.png"
  }
}
Path Parameters
orgID: - When performing operations within an organization, it is essential to use the organization's Base URL or another valid host alias. For example, if your organization is namedtest, your default Base URL will betest.enterprise-sandbox.walt.devwhen using the sandbox environment.target: resourceIdentifier - The target indicates the organization + tenant in which to create the new Verifier service and the service's ID ({organizationID}.{tenantID}.[NewVerifierServiceID]), e.g.waltid.tenant1.verifier1
Body Parameters
type: serviceType - Specifies the type of service to create. In our caseverifierbaseUrl: String - This URL will be included in the generated OIDC4VC offer, allowing the wallet to know how to reach the verifier. It should reflect your organization's base URL. The general format for this URL ishttps://{orgID}.yourEnterpriseStackUrl.com. For example, if your organization is named myorg and the Enterprise Stack is hosted at the domain enterprise-stack.com, your base URL would be: https://myorg.enterprise-stack.com.metadataConfig: Object - Verifier metadata config. Can be used to edit e.g. externally exposed human-readable verifier name and logo. Learn more in general here or expand below to see object property options.
Expand to learn more about metadata config object properties
Metadata Config Object
 "metadataConfig": {
   "name": "walt.id Enterprise Verifier",
   "logoUri": "https://cdn.walt.id/verifier/logo.png"
 }
- `name` (optional) _String_: Human-readable string name of the verifier.
- `logoUri` (optional) _String_: URL string that references a logo for the verifier.
Response Codes
201- Service created successfully.
Issue Credential
Now, we'll issue a verifiable credential using the key and DID created earlier. You can choose to either issue the W3C credential without or with a status (revocation). To issue the credential with a status, you must have completed the optional setup of a Credential Status Service.
To facilitate the issuance of the credential from us (the issuer) to the holder, we will utilise the OID4VCI protocol. In particular, we will be generating an OID4VC offer URL that can be accepted by any OID compliant wallet to receive credential(s).
The credential offer URL specifies the credentials to be issued. This includes details such as the URL of the issuer, the authorisation and token endpoints, and information about the credential's format, type, and scope.
After calling the endpoint, an OID4VCI offer URL is generated. Initially, this URL does not include the actual signed credentials; instead, it contains a list of credentials that we are offering for the wallet to claim. Once the wallet processes this offer and chooses to accept the credential, it will request those credentials through a series of exchanges between the issuer and the wallet. Only at this point, when the wallet requests the credential, will the issuer sign it. Additionally, just before the signing occurs, the provided data functions are executed.
Endpoint: /v1/{target}/issuer-service-api/credentials/issue | API Reference
Example Request
curl -X 'POST' \
  'http://waltid.enterprise.localhost:3000/v1/waltid.tenant1.issuer1/issuer-service-api/credentials/issue' \
  -H 'accept: */*' \
  -H 'Authorization: Bearer {yourToken}' \
  -H 'statusCallbackUri: https://example.com/$id' \
  -H 'Content-Type: application/json' \
  -d '{
  "issuerKeyId": "waltid.tenant1.kms1.key1",
  "issuerDid": "did:key:z6MkjoRhq1jSNJdLiruSXrFFxagqrztZaXHqHGUTKJbcNywp",
  "authenticationMethod": "PRE_AUTHORIZED",
  "credentialConfigurationId": "UniversityDegree_jwt_vc_json",
  "credentialData": {
    "@context": [
      "https://www.w3.org/2018/credentials/v1",
      "https://www.w3.org/2018/credentials/examples/v1"
    ],
    "id": "http://example.gov/credentials/3732",
    "type": [
      "VerifiableCredential",
      "UniversityDegree"
    ],
    "issuer": {
      "id": "did:web:vc.transmute.world"
    },
    "issuanceDate": "2020-03-10T04:24:12.164Z",
    "credentialSubject": {
      "id": "did:example:ebfeb1f712ebc6f1c276e12ec21",
      "degree": {
        "type": "BachelorDegree",
        "name": "Bachelor of Science and Arts"
      }
    }
  },
  "mapping": {
    "id": "<uuid>",
    "issuer": {
      "id": "<issuerDid>"
    },
    "credentialSubject": {
      "id": "<subjectDid>"
    },
    "issuanceDate": "<timestamp>",
    "expirationDate": "<timestamp-in:365d>"
  }
}'
Path Parameters
orgID: - When performing operations within an organization, it is essential to use the organization's Base URL or another valid host alias. For example, if your organization is namedtest, your default Base URL will betest.enterprise-sandbox.walt.devwhen using the sandbox environment.target: resourceIdentifier - The target indicates the organization + tenant + issuer service with which to execute the credential issuance ({organizationID}.{tenantID}.{issuerServiceID}), e.g.waltid.tenant1.issuer1
Header Parameters
statusCallbackUri: URL - Receive updates on the created issuance process, e.g. when a credential was successfully claimed. The parameter expects a URL which can accept a JSON POST request. The URL can also hold a$id, which will be replaced by the issuance session id. For example:https://myurl.com/$id,https://myurl.comorhttps://myurl.com/test/$idExpand To Learn More
Body
The data send to the provided URL will contain a JSON body:
- id : String - the issuance session id
- type: String - the event type
- data: JsonObject - the data for the event
Event Types
Possible events (event types) and their data are:
- resolved_credential_offer with the credential offer as JSON (in our Web Wallet: called when the issuance offer
is
entered into the wallet, but not processing / accepted yet)
- requested_token with the issuance request for the token as json object (called for the token required to receive
the
credentials)
Credential issuance (called for every credential that's issued (= requested from wallet))
- jwt_issue with jwt being the issued jwt
- sdjwt_issue with sdjwt being the issued sdjwt
- batch_jwt_issue with jwt being the issued jwt
- batch_sdjwt_issue with sdjwt being the issued sdjwt
- generated_mdoc with mdoc being the CBOR (HEX) of the signed mdoc
To allow for secure business logic flows, if a callback URL is set, and it cannot be reached, the issuance will not commence further (after that point). If no callback URL is set, the issuance logic does not change in any way.
Body
{
  "issuerKeyId": "waltid.tenant1.kms1.key1",
  "issuerDid": "did:key:z6MkjoRhq1jSNJdLiruSXrFFxagqrztZaXHqHGUTKJbcNywp",
  "authenticationMethod": "PRE_AUTHORIZED",
  "credentialConfigurationId": "UniversityDegree_jwt_vc_json",
  "credentialData": {
    "@context": [
      "https://www.w3.org/2018/credentials/v1",
      "https://www.w3.org/2018/credentials/examples/v1"
    ],
    "id": "http://example.gov/credentials/3732",
    "type": [
      "VerifiableCredential",
      "UniversityDegree"
    ],
    "issuer": {
      "id": "did:web:vc.transmute.world"
    },
    "issuanceDate": "2020-03-10T04:24:12.164Z",
    "credentialSubject": {
      "id": "did:example:ebfeb1f712ebc6f1c276e12ec21",
      "degree": {
        "type": "BachelorDegree",
        "name": "Bachelor of Science and Arts"
      }
    }
  },
  "mapping": {
    "id": "<uuid>",
    "issuer": {
      "id": "<issuerDid>"
    },
    "credentialSubject": {
      "id": "<subjectDid>"
    },
    "issuanceDate": "<timestamp>",
    "expirationDate": "<timestamp-in:365d>"
  }
}
Body Parameters
issuerKeyId: resourceIdentifier - The keyID of a key stored in a KMS service under the same tenant. E.g.waltid.tenant1.kms1.key1issuerDid: String - The DID related to the provided key.credentialConfigurationId: String - Reference to a specific credential configuration the issuer supports. Configured during issuer service setup.credentialData: JSON - A credential data structure to sign (W3C compliant). A list of predefined valid structures can be found here.mapping(optional): JSON - The mapping object that allows for dynamic value insertion via data functions, executed at the time when the credentials is claimed. This feature enables personalized credentials based on real-time data. Learn more about it and see a list of supported data functions here.authenticationMethod: (optional) String - Defines which OIDC4VC exchange flow is used (pre-auth or full-auth). If no value is provided, it will default to pre-auth flow indicated asPRE_AUTHORIZED. The parameter options are:
Expand To Learn More About The Options
PWD- used for authorization code flow with username/password authentication with external auth serverID_TOKEN- used for authorization code flow with id_token authentication. When this method is used an authorization request is sent to the wallet, which generates and issues the ID_TOKEN using its DID ( Decentralized Identifier). The issuer then verifies the ID_TOKEN to confirm the holder's identity and DID.VP_TOKEN- used for authorization code flow with vp_token(OIDC4VP). With this method, the receiver of the credential must be authenticated by presenting the requested credential. The credential which must be presented can be configured using thevpRequestedValueas explained below. The policies which are applied to the presented credential are 'signature,' 'expired,' and 'not-before.' Learn more about policies here.NONE- used for authorization code flow with none authentication methodPRE_AUTHORIZED- used for pre-authorizated code flow
Additional parameters required for selected auth method:
For "ID_TOKEN" and "VP_TOKEN":
useJar: (Optional) Boolean - used for using JAR OAuth specification in the id/vp_token requests. If omitted, the default value is true.
For VP_TOKEN:
vpRequestedValue: String - Specifies the requested credential type value for the VP token. E.g. "VerifiableId"vpProfile: (Optional) String - Specifies the profile of the VP request. Available Profiles: DEFAULT: For W3C OpenID4VP, ISO_18013_7_MDOC: For MDOC OpenID4VP, EBSIV3: For EBSI V3 Compliant VP. If omitted, the default value is DEFAULT
Example Response
The issuer endpoint will respond with Credential Offer URL.
Plain Response
openid-credential-offer://issuer.portal.walt.id/?credential_offer=%7B%22credential_issuer%22%3A%22https%3A%2F%2Fissuer.portal.walt.id%22%2C%22credentials%22%3A%5B%7B%22format%22%3A%22jwt_vc_json%22%2C%22types%22%3A%5B%22VerifiableCredential%22%2C%22UniversityDegree%22%5D%2C%22credential_definition%22%3A%7B%22%40context%22%3A%5B%22https%3A%2F%2Fwww.w3.org%2F2018%2Fcredentials%2Fv1%22%2C%22https%3A%2F%2Fwww.w3.org%2F2018%2Fcredentials%2Fexamples%2Fv1%22%5D%2C%22types%22%3A%5B%22VerifiableCredential%22%2C%22UniversityDegree%22%5D%7D%7D%5D%2C%22grants%22%3A%7B%22authorization_code%22%3A%7B%22issuer_state%22%3A%220431b78c-cd94-4f50-bfdf-e24d436c0cf6%22%7D%2C%22urn%3Aietf%3Aparams%3Aoauth%3Agrant-type%3Apre-authorized_code%22%3A%7B%22pre-authorized_code%22%3A%22eyJhbGciOiJFZERTQSJ9.eyJzdWIiOiIwNDMxYjc4Yy1jZDk0LTRmNTAtYmZkZi1lMjRkNDM2YzBjZjYiLCJpc3MiOiJodHRwczovL2lzc3Vlci5wb3J0YWwud2FsdC5pZCIsImF1ZCI6IlRPS0VOIn0.NorG7GtjmA-HXMJfUzU9vfnshcIgFY0oYQb8qJjDfORPoNxuurgySSOIDKFi7Z4XJmC-oJZnM0Nbb0NUd57cDA%22%2C%22user_pin_required%22%3Afalse%7D%7D%7D
Decoded
openid-credential-offer://issuer.portal.walt.id/?
credential_offer=
{
  "credential_issuer": "https://issuer.demo.walt.id",
  "credentials": [
    {
      "format": "jwt_vc_json",
      "types": [
        "VerifiableCredential",
        "UniversityDegree"
      ],
      "credential_definition": {
        "@context": [
          "https://www.w3.org/2018/credentials/v1",
          "https://www.w3.org/2018/credentials/examples/v1"
        ],
        "types": [
          "VerifiableCredential",
          "UniversityDegree"
        ]
      }
    }
  ],
  "grants": {
    "authorization_code": {
      "issuer_state": "0431b78c-cd94-4f50-bfdf-e24d436c0cf6"
    },
    "urn:ietf:params:oauth:grant-type:pre-authorized_code": {
      "pre-authorized_code": "eyJhbGciOiJFZERTQSJ9.eyJzdWIiOiIwNDMxYjc4Yy1jZDk0LTRmNTAtYmZkZi1lMjRkNDM2YzBjZjYiLCJpc3MiOiJodHRwczovL2lzc3Vlci5wb3J0YWwud2FsdC5pZCIsImF1ZCI6IlRPS0VOIn0.NorG7GtjmA-HXMJfUzU9vfnshcIgFY0oYQb8qJjDfORPoNxuurgySSOIDKFi7Z4XJmC-oJZnM0Nbb0NUd57cDA",
      "user_pin_required": false
    }
  }
}
If you want to dive deeper into the issuer service, you can go here.
Receive the Credential Offer
Use the Enterprise Wallet Service to receive and store the credential:
Endpoint: /v1/{target}/wallet-service-api/credentials/receive
curl -X 'POST' \
  'http://waltid.enterprise.localhost:3000/v1/waltid.tenant1.wallet1/wallet-service-api/credentials/receive' \
  -H 'accept: */*' \
  -H 'Authorization: Bearer {yourToken}' \
  -H 'Content-Type: application/json' \
  -d '{
  "offerUrl": "<paste-offer-url-from-issuer-step>",
  "keyReference": "waltid.tenant1.wallet-kms-1.wallet_key",
  "didReference": "waltid.tenant1.wallet-did-store-1.wallet_did"
}'
This runs the full OID4VCI flow from the wallet-side and stores the received credential in the linked Credential Store.
Optional: You can also render the credential offer as a QR code for any OID4VCI-compliant wallet to scan.
Verify A Credential
To request and verify the credential issued previously we will leverage the verifier service and make the following request.
curl -X 'POST' \
  'http://waltid.enterprise.localhost:3000/v1/waltid.tenant1.verifier1/verifier-service-api/credentials/verify' \
  -H 'accept: */*' \
  -H 'Authorization: Bearer {yourToken}' \
  -H 'authorizeBaseUrl: openid4vp://authorize' \
  -H 'responseMode: direct_post' \
  -H 'successRedirectUri: https://example.com/success/{id}' \
  -H 'errorRedirectUri: https://example.com/error/{id}' \
  -H 'statusCallbackUri: https://example.com/status_callback/{id}' \
  -H 'statusCallbackApiKey: myAPIKey' \
  -H 'stateId: myUniqueStateValue' \
  -H 'Content-Type: application/json' \
  -d '{
  "request_credentials": [
    { "type": "UniversityDegree", "format": "jwt_vc_json" }
  ]
}'
Path Parameters
orgID: - When performing operations within an organization, it is essential to use the organization's Base URL or another valid host alias. For example, if your organization is namedtest, your default Base URL will betest.enterprise-sandbox.walt.devwhen using the sandbox environment.target: resourceIdentifier - The target indicates the organization + tenant + verifier service with which to execute the credential verification ({organizationID}.{tenantID}.{verifierServiceID}), e.g.waltid.tenant1.verifier1
Header Parameters
- authorizeBaseUrl - is used to modify the start of the OID4VC request URL. If you are using the
cross-device
flow, where you will display the URL as a QR code, you can leave the value as
openid4vp://authorizeor if you don't know the wallet the user will be using to claim the credential. If you are using the same device flow, where you already know the user's wallet and want the user to be able to go directly to it, you can use the wallet URL path that is able to receive an OIDC request as a query parameter. Our wallet for example can receive OID4VC requests herehttps://wallet.demo.walt.id/wallet-api/wallet/{wallet}/exchange/useOfferRequest. - responseMode - should be
direct_postas the other options are not yet supported. - successRedirectUri (optional) - is used to redirect the user if verification is successful. You can use the
$idplaceholder to get access to the id of verification session in your application in order to retrieve the verification results. E.g./success?id=$idwill be replaced with/success?id=1234567890 - errorRedirectUri (optional) - is used to redirect the user if verification is unsuccessful. You can use the
$idplaceholder to get access to the id of verification session in your application in order to retrieve the verification results. E.g./error?id=$idwill be replaced with/error?id=1234567890 - statusCallbackUri (optional) - URL that should be called when the presentation request has been fulfilled by a
wallet. The request
sent will be a
POSTincluding the whole presentation result. See Verification Status Policies Response - statusCallbackApiKey (optional) - If the endpoint you provide via
statusCallbackUriis protected, you can use thestatusCallbackApiKeyto authenticate. The provided key will be appended as Authorization Header to the request. - stateId (optional) - overwrite the unique
statevalue which gets created for each verification request with your own. - openId4VPProfile (optional) - Define profile for VP (Verifiable Presentation) request. The default is W3C
OpenID4VP, which can optionally provided as
DEFAULT. Apart from that, you can choose from the following options:EBSIV3: For EBSI V3 compliant VP. Learn more here.ISO_18013_7_MDOC: For mdoc Openid4VP.
Body
{
  "request_credentials": [
    { "type": "UniversityDegree", "format": "jwt_vc_json" }
  ]
}
Body Parameters
- request_credentials - An array of objects detailing the credentials to be requested from the user. Each object
varies based on the type of credential being requested.
Expand To Learn More
Below are the possible credential types and their respective object structures:
1. **W3C JWT Credential**

- **type** Specifies the type of credential (e.g., `VerifiableID`, `VerifiableDiploma`). This maps to the `type`
  attribute in W3C credentials.
- **format**: Describes the format of the credential. For W3C JWT credentials, this would
  be `jwt_vc_json`.
  ```json
  { "type": "ProofOfResidence", "format": "jwt_vc_json" }
  ```

2. **SD-JWT VC Credential (IETF Standard)**

- **vct**: Specifies the type of credential (e.g., https://issuer.com/identity_credential). This maps to
  the `vct`
  attribute in the SD-JWT VC credential.
- **format**: Describes the format of the credential. For SD-JWT VC credentials, this would be
  vc+sd-jwt.: Describes the format of the credential. For SD-JWT VC credentials, this would be `vc+sd-jwt`.
 ```json
 { "vct": "test.com/identity_credential", "format": "vc+sd-jwt" }
 ```
3. **mDL Credential (ISO/IEC 18013-5)**

- **doc_type**: Specifies the type of credential (e.g., org.iso.18013.5.1.mDL). This maps to the doc_type
  attribute of
  the mdoc document.
- **format**: Describes the format of the credential. For mDL credentials, this would be `mso_mdoc`.
  ```json
  { "doc_type": "org.iso.18013.5.1.mDL", "format": "mso_mdoc" }
  ```
Optional Parameters
Next to describing the type and format of the credential, the objects also take an optional policies and id
attribute
- **policies**: An array of policies to apply to the specified credential. A list of all policies can be
  found [here](../4.services/4.verifier-service/3.policies/0.overview.md).
- **id**: Used to set a specific id for the
  generated [Presentation Definition](https://identity.foundation/presentation-exchange/spec/v1.0.0/#presentation-definition).
  If not set,
  the verifier API auto-assigns a generated one.
Present the Credential
Use the Enterprise Wallet Service to present the stored credential in response to the verifier’s request URL.
Find Matching Credentials via Presentation Definition
Before presenting, use the wallet's linked credential store to find credentials matching the verifier's presentation definition. From the response, take the _id (e.g., waltid.tenant1.wallet-credential-store-1.3d629d4b-...) and use it in the next step.
Endpoint: /v1/{target}/credential-store-service-api/credentials/query/document/schema
Example Request
curl -X 'POST' \
  'http://waltid.enterprise.localhost:3000/v1/waltid.tenant1.wallet-credential-store-1/credential-store-service-api/credentials/query/document/schema' \
  -H 'accept: */*' \
  -H 'Authorization: Bearer {yourToken}' \
  -H 'Content-Type: application/json' \
  -d '[
  {
    "path": ["$.vc.type"],
    "filter": { "type": "string", "pattern": "UniversityDegree" }
  }
]'
Path Parameters
orgID: - When performing operations within an organization, it is essential to use the organization's Base URL or another valid host alias. For example, if your organization is namedtest, your default Base URL will betest.enterprise-sandbox.walt.devwhen using the sandbox environment.target: resourceIdentifier - The target indicates the organization + tenant + credential store which should be used to query for credentials ({organizationID}.{tenantID}.[credentialStoreID]), e.g.waltid.tenant1.credential-store1
Body
[
  {
    "path": ["$.vc.type"],
    "filter": { "type": "string", "pattern": "UniversityDegree" }
  }
]
Body Parameters
Array of contraints.fields- In the body of the request, we provide an array containing the values for eachconstraints.fieldsentry in allinput_descriptorsobjects of the presentation definition provided in the Authorization Request. For example, the presentation definition for the body provided above looks as follows:
{
  "id": "ANREjIRDBnb",
  "input_descriptors": [
    {
      "id": "BankId",
      "format": {
        "jwt_vc_json": {
          "alg": [
            "EdDSA"
          ]
        }
      },
      "constraints": {
        "fields": [
          // ⬇️ what we provide in the body ⬇️
          {
            "path": [
              "$.vc.type"
            ],
            "filter": {
              "type": "string",
              "pattern": "BankId"
            }
          }
          // ⬆️ what we provide in the body ⬆️
        ]
      }
    }
  ],
  "format": {
    "jwt_vp_json": {
      "alg": [
        "ES256"
      ]
    }
  }
}
Reponse Codes
200- Matching credentials
Body
[
  {
    "_id": "waltid.tenant1.wallet-credential-store-1.b5db5ab5-03cb-4103-a0ff-0299edad15ee",
    "credential": {
      "type": "vc-w3c_1_1",
      "disclosables": {},
      "credentialData": {
        "@context": [
          "https://www.w3.org/2018/credentials/v1",
          "https://www.w3.org/2018/credentials/examples/v1"
        ],
        "id": "urn:uuid:4b776a85-dbc3-4c14-9c0f-2428a3e98b7b",
        "type": [
          "VerifiableCredential",
          "UniversityDegree"
        ],
        "issuer": {
          "id": "did:key:z6Mkkbug58H7h3fts2W8mqQUPGTeXX3wEa32fY3Jk15nJNYf"
        },
        "issuanceDate": "2025-08-18T12:35:53.055156800Z",
        "credentialSubject": {
          "id": "did:key:z6MkegzJFcs5txZwv4NrAx2JAkv38MYq9ydwjsFXsV3Sn1Ed",
          "degree": {
            "type": "BachelorDegree",
            "name": "Bachelor of Science and Arts"
          }
        },
        "credentialStatus": {
          "id": "https://83abcuyiuweiuoyiy8943ir732yjhghj23gdnshuy7623rjh23jhrg23g78hkkk.s3.amazonaws.com/waltid.tenant1.credential-status-service-1.config1#10561",
          "type": "StatusList2021Entry",
          "statusPurpose": "revocation",
          "statusListIndex": "10561",
          "statusSize": 1,
          "statusListCredential": "https://83abcuyiuweiuoyiy8943ir732yjhghj23gdnshuy7623rjh23jhrg23g78hkkk.s3.amazonaws.com/waltid.tenant1.credential-status-service-1.config1",
          "statusMessage": [
            {
              "status": "0x0",
              "message": "unset"
            },
            {
              "status": "0x1",
              "message": "set"
            }
          ]
        },
        "expirationDate": "2026-08-18T12:35:53.055397550Z"
      },
      "signature": {
        "type": "signature-jwt",
        "signature": "hsHnzRzN_-Tcq0TPiJYKxJnCIliIq63LcQpC7ctKSegc6Rb40dSx6puhgX9qIOFo1mOAGSsEcjMk8pTc8MwYBQ"
      },
      "signed": "eyJraWQiOiJkaWQ6a2V5Ono2TWtrYnVnNThIN2gzZnRzMlc4bXFRVVBHVGVYWDN3RWEzMmZZM0prMTVuSk5ZZiN6Nk1ra2J1ZzU4SDdoM2Z0czJXOG1xUVVQR1RlWFgzd0VhMzJmWTNKazE1bkpOWWYiLCJ0eXAiOiJKV1QiLCJhbGciOiJFZERTQSJ9.eyJpc3MiOiJkaWQ6a2V5Ono2TWtrYnVnNThIN2gzZnRzMlc4bXFRVVBHVGVYWDN3RWEzMmZZM0prMTVuSk5ZZiIsInN1YiI6ImRpZDprZXk6ejZNa2VnekpGY3M1dHhad3Y0TnJBeDJKQWt2MzhNWXE5eWR3anNGWHNWM1NuMUVkIiwidmMiOnsiQGNvbnRleHQiOlsiaHR0cHM6Ly93d3cudzMub3JnLzIwMTgvY3JlZGVudGlhbHMvdjEiLCJodHRwczovL3d3dy53My5vcmcvMjAxOC9jcmVkZW50aWFscy9leGFtcGxlcy92MSJdLCJpZCI6InVybjp1dWlkOjRiNzc2YTg1LWRiYzMtNGMxNC05YzBmLTI0MjhhM2U5OGI3YiIsInR5cGUiOlsiVmVyaWZpYWJsZUNyZWRlbnRpYWwiLCJVbml2ZXJzaXR5RGVncmVlIl0sImlzc3VlciI6eyJpZCI6ImRpZDprZXk6ejZNa2tidWc1OEg3aDNmdHMyVzhtcVFVUEdUZVhYM3dFYTMyZlkzSmsxNW5KTllmIn0sImlzc3VhbmNlRGF0ZSI6IjIwMjUtMDgtMThUMTI6MzU6NTMuMDU1MTU2ODAwWiIsImNyZWRlbnRpYWxTdWJqZWN0Ijp7ImlkIjoiZGlkOmtleTp6Nk1rZWd6SkZjczV0eFp3djROckF4MkpBa3YzOE1ZcTl5ZHdqc0ZYc1YzU24xRWQiLCJkZWdyZWUiOnsidHlwZSI6IkJhY2hlbG9yRGVncmVlIiwibmFtZSI6IkJhY2hlbG9yIG9mIFNjaWVuY2UgYW5kIEFydHMifX0sImNyZWRlbnRpYWxTdGF0dXMiOnsiaWQiOiJodHRwczovLzgzYWJjdXlpdXdlaXVveWl5ODk0M2lyNzMyeWpoZ2hqMjNnZG5zaHV5NzYyM3JqaDIzamhyZzIzZzc4aGtray5zMy5hbWF6b25hd3MuY29tL3dhbHRpZC50ZW5hbnQxLmNyZWRlbnRpYWwtc3RhdHVzLXNlcnZpY2UtMS5jb25maWcxIzEwNTYxIiwidHlwZSI6IlN0YXR1c0xpc3QyMDIxRW50cnkiLCJzdGF0dXNQdXJwb3NlIjoicmV2b2NhdGlvbiIsInN0YXR1c0xpc3RJbmRleCI6IjEwNTYxIiwic3RhdHVzU2l6ZSI6MSwic3RhdHVzTGlzdENyZWRlbnRpYWwiOiJodHRwczovLzgzYWJjdXlpdXdlaXVveWl5ODk0M2lyNzMyeWpoZ2hqMjNnZG5zaHV5NzYyM3JqaDIzamhyZzIzZzc4aGtray5zMy5hbWF6b25hd3MuY29tL3dhbHRpZC50ZW5hbnQxLmNyZWRlbnRpYWwtc3RhdHVzLXNlcnZpY2UtMS5jb25maWcxIiwic3RhdHVzTWVzc2FnZSI6W3sic3RhdHVzIjoiMHgwIiwibWVzc2FnZSI6InVuc2V0In0seyJzdGF0dXMiOiIweDEiLCJtZXNzYWdlIjoic2V0In1dfSwiZXhwaXJhdGlvbkRhdGUiOiIyMDI2LTA4LTE4VDEyOjM1OjUzLjA1NTM5NzU1MFoifSwianRpIjoidXJuOnV1aWQ6NGI3NzZhODUtZGJjMy00YzE0LTljMGYtMjQyOGEzZTk4YjdiIiwiZXhwIjoxNzg3MDU2NTUzLCJpYXQiOjE3NTU1MjA1NTMsIm5iZiI6MTc1NTUyMDU1M30.hsHnzRzN_-Tcq0TPiJYKxJnCIliIq63LcQpC7ctKSegc6Rb40dSx6puhgX9qIOFo1mOAGSsEcjMk8pTc8MwYBQ"
    },
    "parent": "waltid.tenant1.wallet-credential-store-1"
  }
]
The returned array will include _id values like waltid.tenant1.wallet-credential-store-1.<credentialId> that you can pass directly in the credentials array when presenting.
Present Credential via wallet
Endpoint: /v1/{target}/wallet-service-api/credentials/present
Example Request
curl -X 'POST' \
  'http://waltid.enterprise.localhost:3000/v1/waltid.tenant1.wallet1/wallet-service-api/credentials/present' \
  -H 'accept: */*' \
  -H 'Authorization: Bearer {yourToken}' \
  -H 'Content-Type: application/json' \
  -d '{
  "requestUrl": "<paste-verifier-request-url>",
  "keyReference": "waltid.tenant1.wallet-kms-1.wallet_key",
  "didReference": "waltid.tenant1.wallet-did-store-1.wallet_did",
  "credentials": [
    { "credential": "waltid.tenant1.wallet-credential-store-1.<credentialIdFromPreviousStep>" }
  ]
}'
You must provide at least one credential to present via the credentials array. Use the presentation-definition query step above to obtain a valid credential reference from the wallet's Credential Store.
(Optional) Selective disclosure
If your credential supports selectively disclosable fields, you can specify exactly which fields to share:
{
  "credentials": [
    {
      "credential": "waltid.tenant1.wallet-credential-store-1.<credentialId>",
      "disclosures": [
        "$.name",
        "$.credentialSubject.achievement.description"
      ]
    }
  ]
}
Under the hood, the wallet wraps the credential(s) in a Verifiable Presentation and signs it with the holder’s key referenced by keyReference, proving possession to the verifier.
Inspect Verification Result
After the we've presented the credential(s), we can now verify the status by performing the following call with the
state value obtained from the URL query params we received from the verifier service previously.
Example
openid4vp://authorize?...state=waltid.tenant1.verifier1.fb94470b-bcee-4ed7-93f5-906a4f5f585d...
Making the call to receive the verification result
curl -X 'GET' \
  'http://waltid.enterprise.localhost:3000/v1/waltid.tenant1.verifier1.{state}/verifier-service-api/credentials/sessions/view' \
  -H 'accept: */*'
  -H 'Authorization: Bearer {yourToken}'
Path Parameters
orgID: - When performing operations within an organization, it is essential to use the organization's Base URL or another valid host alias. For example, if your organization is namedtest, your default Base URL will betest.enterprise-sandbox.walt.devwhen using the sandbox environment.target: resourceIdentifier - The target indicates the organization + tenant + verifier service + sessionID to request ({organizationID}.{tenantID}.{verifierServiceID}.{sessionID}), e.g.waltid.tenant1.verifier1.fb94470b-bcee-4ed7-93f5-906a4f5f585d
Verification Status Policies Response
The response of the verification status call will contain the status of the verification policies applied to the credential(s) presented by the user. The policy results will be in the following format:
{
  "verificationResult": true,
  "policyResults": {
    "results": [
      {
        "credential": "VerifiableDiploma",
        "policies": [
          {
            "policy": "signature",
            "is_success": true
          }
        ]
      }
    ]
  }
}
The verificationResult field will be true if all policies were successful, otherwise it will be false.
The policyResults field will contain the results of the policies applied to each credential. The credential field
will contain the name of the credential, and the policies field will contain the results of the policies applied to
the credential. The policy field will contain the name of the policy, and the is_success field will contain the
result of the policy.
Want to learn more about the verifier service in detail? Please go here.
5. Bonus
With this we went through a whole credential issuance and verification flow using different services of the walt.id Enterprise Stack. If you want, you can now (when you issued a credential with status), revoke the issued credential and run through the verification another time. This time it should fail. For guidence on how to revoke the credential, please go here.